Projects for 2016

Happy New Years Everyone!!!

Here’s a preview of a few projects that I have planned for this year.

Automated AeroGarden

An automated AeroGarden based hydroponic-ish herb garden. I picked up this AeroGarden version 3 at a resale shop for about $8. I took it apart, cleaned it up, tested the unit and found it to be in working order. I need to replace the tubing and filter but all in all that’s a good find. I will be doing this project in stages. First will be 3d printing the planter cartridges that hold the sponge and just get the unit functioning. 2nd will be automating a few functions using an Arduino and holding tanks for nutrients and reserve water.

AeroGarden

Time-lapse Camera

An Arduino based Time-lapse Camera. This will be used in production of Dared to Survive shows.

Game Camera

An Arduino based Game Camera that will also collect environmental information such as Temperature, Humidity, etc. The data will be stored on an SD-Card and will be later used in an app to develop forecasting predictions.

Passive Repeater

I want to attempt a few things with a Passive Repeater design that integrates simple bi-directional amplification and/or filters.

Bench Top Power Supply

A simple bench top power supply made from PC and Server power supplies.

More Podcasts

I plan on starting a weekly 15 min per episode podcast covering my top 5 favorite Instructables projects.

I’m sure this list will change throughout the year so stay tuned. Have project suggestions or requests? Reach out to me @Mr_Red_Beard  on Twitter.

HP JetDirect 300X j3263a

I have an older HP LaserJet P2035 that I picked up a while back for like $30. The printer works great but it isn’t networked so every time something needs to be printed I have to tote the laptop into the room and hook it up via USB. Solution! An office was getting rid of a bunch of stuff recently and one of the things they got rid of was an HP JetDirect 300X j3263a. This device has a network port and a serial port that attaches to the printer.

HPJetDirect300X

Today I hooked up the JetDirect to my printer and the network. To get started I pushed the test button to get configuration info sheet printed. That much worked! I noticed that the device was already configured for a network so did some digging and found out I could factory reset the device.

  • Unplug the power from the JetDirect
  • Hold down the Test button while plugging power back in
  • Keep Holding the Test button for 30 seconds
  • Wait 10 seconds then unplug the power then plug back in (grabs an IP address from the network)
  • Wait 5 seconds after power on then press Test button (prints info sheet with IP address)

Ok so now I have a local IP address but for this to work properly I need to reserve the IP address issued in my router so that the JetDirect always has the same IP address.

Success! I setup a network printer pointed at the IP address allocated for the JetDirect. Windows discovered the LaserJet on the other end and installed with no issue. I could use it like this but I’d like to see what the new firmware would bring to the table.

Fail! I first tested to see if the JetDirect web interface was responding and it was but no options appeared. Turns out that this model uses Java and possibly some form of an ActiveX control. If this can’t be changed via a firmware update and is an issue there is always the Telnet interface on the JetDirect. Also features may not be enabled on the device.

HPJetDirectWebInterface

Fail! I tried using the HP Web JetAdmin application but couldn’t get it to work. This maybe due to compatibility issues or because of the way I have my network setup.

Success! Next attempt TelNet. I used Putty as a client. Well there’s no login, no password, no username, nothing.

  • Usernames: root, admin, administrator, supervisor
  • Default telnet password: password

Below are some TelNet Commands to either enable or disable features. Disabled = 0 & Enabled = 1.

  • ipp-config: 0 (Enable/Disable Internet Printing)
  • ftp-config: 0 (Enable/Disable FTP)
  • ews-config: 0 (Enable/Disable Embedded Web Server)
  • snmp-config: 0 (Enable/Disable Simple Network Management Protocol)
  • syslog-config: 0 (Enable/Disable server logging)
  • set-cmnty-name: (Sets SNMP community string)
  • syslog-svr: (Sets address of log server)
  • ip: (Sets IP address)
  • subnet-mask:
  • default-gw: (Default Gateway)
  • quit (save and exit)
  • exit (exit and do not save)

Success! Using an FTP client with username root and no password I was able to connect.

Download firmware from http://h20564.www2.hp.com/hpsc/doc/public/display?docId=emr_na-bpj07429

Fail! Upgrading firmware via FTP. There’s supposed to be a folder called Download on the JetDirect via FTP but I don’t see one. Lets throw something at the wall and see if it sticks. I’ll just upload the firmware to the root directory…. and waiting. FTP errored out then telnet and web interfaced stopped responding correctly. Maybe it’s working? Everything I’ve read says that the JetDirect will automatically reboot….. Still waiting. Ok went to the printer and found that the printer was out of paper and that it had printed several messages/codes spit out blank pages leaving the printer empty. I put paper in and the JetDirect reset printing out the message below.

JetDirectFTPErrorPrintout

Fail! I attempted to the JetDirect update via TFTP with the commands below upon completion I got the message “Please wait, network upgrade will begin in a few seconds”. I used SolarWinds TFTP server on Windows 10. Nothing changes the version stays the same and the TFTP server log doesn’t show any activity from the JetDirect.

  • tftp-server:xxx.xxx.xxx.xxx
  • upgrade-file:300X_H0867.dld
  • upgrade

To be continued……..

How I fixed my Poweradd Solar Panel Portable Charger

Poweradd Apollo 7200mAh High Capacity Solar Panel Portable Charger
Solar type: Monocrystalline Solar Panel (highest efficiency rates)
Original Cost: $19.99 on Amazon

The other day I was very bummed to find out that my solar charging battery backup had failed and no longer charged via sun or either USB. I wrote the seller on Amazon from who I purchased the device with no answer. Considering the high failure rate I was seeing while trying to find a fix and the fact that it didn’t cost a whole lot I figured what the heck I’ll try to fix it because what’s the worst that could happen cause it’s already broken.

First problem disassembling

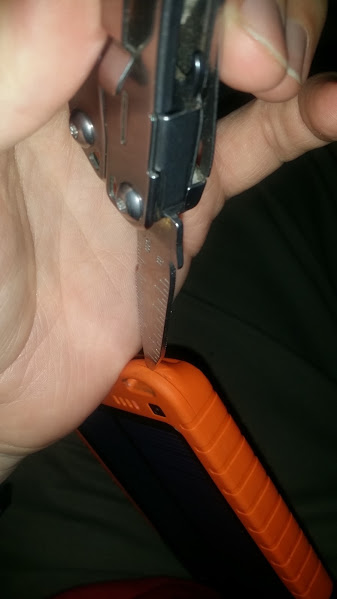
There are no screws so the case just snaps together? Turns out yes but there is an adhesive tab on top of the battery stuck to the back of the solar panel. Pay attention to the wires when taking apart. Loosen the case all the way around with a flat edge blade or screwdriver then pull apart at the bottom end first (opposite of USB ports).

Finding The Problem

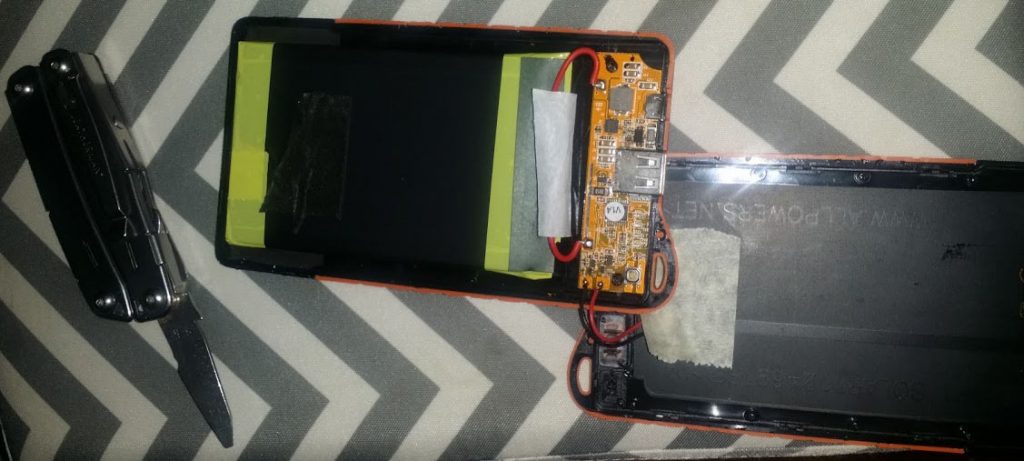
What I think happened is that the lithium ion battery protection circuit got activated (lack of better term)? Maybe? So what I did was first check the voltage directly from the battery and got about 3vdc, then on the opposite side of the main protection circuit at about 3vdc. So the battery has a charge which means the battery didn’t fail.

Battery is good and I have voltage so did a component fail?

I decided to start bypassing voltage regulators and charging circuits using alligator clips to see if I could get the battery to turn on. In the end I hooked the voltage entering the circuit directly to the opposite side of this diode or resistor (I forgot to note it and the resolution sucks) then held down the power button. Viola I’ve got power!

Code Contest on Instructables

Coded Creations

Instructables with sponsorship by Microsoft is holding a contest for the best Instructables that are code related. The contest is called Coding Creations and among many prizes is a surface pro 3 and a Spark Prototyping Bundle.  The judges prize is for the “best use of Visual Studio,  Microsoft Azure, Kinect/Xbox, Windows Phone apps, or any Windows app” so if anyone has any ideas let me know.

So far I have submitted 2 Instructables for this competition, A View-State Key Generator (in c# & php) and a simple app that does Image Edge Detection.

This is a link to my profile on Instructables.


Trip to a Mini Maker Faire

nlrmmf

So it was pretty awesome for their to be a local Maker anything in Central Arkansas. I can’t wait to see if we get a Maker Space so I can spend countless hours there making gadgets. This Mini Maker Faire was put on by the Arkansas Innovation Hub on Saturday May 2nd which until this event I wasn’t familiar with. I did a terrible job at taking photos and I guess was too busy geeking out. This event had everything from robotics and laser powered projectors to forges and gas powered bicycles.

20150502_134020 20150502_125605

20150502_124959 20150502_125113


‪#‎MakerFaireNLR‬ ‪#‎MakerFaire‬ ‪#‎ARidea‬

Chickens! Part 6

Day 84

Can’t believe its been 84 days. I need to be taking more photos. Just a note that I’ve only spent about $40 in feed.

These little raptors are getting bigger. Just to think these guys ancestors were most likely dinosaurs.

Chickens Day 84 Chickens Day 84


Chickens! Part 5

Day 37

Mounted the poles to the top of the kennel last night so that I could hang the rabbit cages. I used U-bolts to attach the cages to the poles and I used 2 poles so that the cages would remain stationary.

20150322_174104


20150322_174348


Rabbit Cages

My DIY E-Cig Was on HackADay

A while back I posted a DIY Variable Voltage E-Cig how-to on Instructables.com and it eventually got picked up on HackADay.com here. I look at articles that make their way to HackADay as successes so when I found out that mine had made it I got excited and nerded out.

DIY E-Cig

Since then I have taken feedback from readers and updated the schematics to be more efficient and longer lasting. I have plans to one day publish an Arduino based variable voltage and wattage version with display that will fire sub-ohm coils.

Chickens! Part 4

Day 28

So we needed a way to protect the chickens and rabbits from other animals. The plan was to create a border around the fence with chicken wire. This will prevent the rabbits from digging out and other animals from digging in.

I picked up some tent stakes yesterday from Harbor Freight for about $2 a pack and some chicken wire from Tractor Supply a little while ago. Today we got out and installed it, below is the result. Also from Harbor Freight is a 10’x12′ net I got for $30 with a 20% off coupon to cover the top of the kennel to prevent hawks from getting in.

Next step is to build the hanging cages for the rabbits.

Stakes for kennel Stakes for kennel Stakes for kennel


Top