Day 24
They grow fast! The chicken box & top is working out great. It won’t be long before they go out to the pen.
Into the mind of Mr Red Beard – DIY Projects, Janky Science, Outlet for Nerding Out, Robotics, Programming, Electronics and whatever whim I’m feeling.
Day 9
Chickens we’re getting too big for the box so we upgraded to larger rubber tub. They quickly found their way out this one too so I had to come up with a way to contain them. This is just a temporary measure until all of the winter weather has pushed out and the kennel is fully setup.
I cut the middle of the lid out and sandwiched chicken wire between 2 sets of 2 1×4’s then screwed them together.
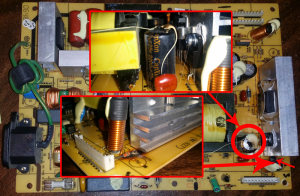
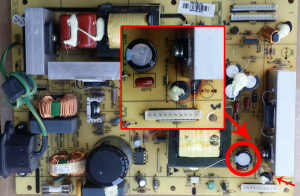
Got a call about this Philips TV and was asked if I could fix it. When I went to check it out the TV was already taken apart and the owner had already researched the issue identifying the power supply as the culprit. At first look I saw that he was right because there was a section blown out to include an erupted capacitor. So I left with a part number of and the power supply.

Power Supply Unit: 715t2056-1
This the same power supply used in several products so I thought if nothing else I might be able to salvage an old power supply board from something else. Its more fun to try and fix the issue so I was hoping salvage wouldn’t be the solution. I ordered the surface mounted resistor, zener diode and capacitor from Mouser for less than $2.
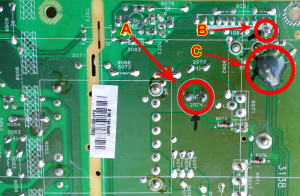
I removed and replaced the capacitor with no issues. Then I began to remove the diode and the damage really reared its head. Whenever these parts blew it blew a chunk of circuit board with it that wasn’t noticeable until the solder was taken off. This took off the surface mounted resistor and the mounting location for one side of the diode. Well crap! After giving this some thought I came to the conclusion that the resistor was probably more for tolerance matching and protection than anything else so I refilled the broken trace and connected the diode directly to it. This was a bit sloppy due to the missing pieces of circuit board so I covered the area with hot glue to secure it.


A. Capacitor B. Diode Connection C. Repaired Broken Trace, Bypassed Resistor & Diode Connection
Not being able to test it immediately after repair made me a bit worried. Today I went back and installed the repaired power supply and reassembled the TV just enough to test it out. When we plugged it in I could hear it hum to life automatically. Initially it did nothing but light up the power button but after a few seconds the screen came on and this older flat-screen TV got an extended life for less than two dollars.
Update to my previous article on the WRT54G V8
This has to be the 4 or 5th Linksys WRT that has suddenly fizzled out. This WRT54G V8 was running modded firmware but in a stable fashion, not overclocked, not over powered. I got maybe 5 months of use out of it before it bit the dust. Linksys has been passed around to a few companies over the past 10 or so years to include Cisco and now I think I know why. With that I say farewell to Linksys and will most likely not own another.
Randy Builds Things and sometimes Randy Destroys Things. If that doesn’t get your attention I don’t know what will. This blog has an assortment of projects that include repairs, tear downs and builds. There’s not a ton of posts, I can’t say much, but this is one to watch. I might have to ask Randy to move his blog to MickRed.
http://randybuildsthings.wordpress.com/
Randy is a geekly filmmaker and producer that likes to work with computers, media and power tools, not necessarily in that order.

I searched for a while to try and find a power cord with no luck. So I bought and installed a new one from Radio Shack. IT WORKS!!!
So a while back I posted a how-to on displaying a user’s Instructables projects on their own site or projects of those that they follow. I have since then created a WordPress plugin to do the work for you.
Download the Instructables Plugin Here
If you’re not familiar with www.Instructables.com and are interested in DIY projects go check it out.
Do you author DIY/How-To’s on Instructables?
Do you like the projects on Instructables?
This plugin allows you to post the latest projects you or other authors have posted or projects by keyword on your own site. See an example below
This is an expansion of an Instructable I wrote a while back that you can find here http://www.instructables.com/id/Display-your-Instructables-on-a-Wordpress-or-PHP-b/
Display a user’s projects:
[instructablesUP username=”MrRedBeard” num=”2″ thumb=”true”]
Display a list of projects by keyword:
[instructablesKW keyword=”tent” num=”3″ thumb=”true”]
View state issues with the error “Validation of viewstate MAC failed”. I ran across this error while building a report in ASP.net c# web forms. The error first started when a viewer refreshed the screen after a long period of no use. Evidently this is a common issue with dotNet apps located on a server instance that also houses several other applications within the same instance (same issues as those experienced with a Web Farm). One fix I found to get around this issue is to switch from auto-generated keys to defining static complex keys.
The following is generated from a completely random key generator that I have developed. Refresh the screen to generate a new set of keys.
validationKey is SHA1 and 128 bits
decryptionKey is AES and 64 bits
Add this to your web.config
[MachineKeyGen][/MachineKeyGen]Adapted from this MSDN article on MachineKey Configuration.
I have a Linksys WRT54G router and I want to do more with it than the original firmware allows. The key to this is replacing the firmware with a beefed up version. The first step will be identifying a new firmware and DDWRT it is. After looking through various router replacement firmwares I found that the best choice is going to be DDWRT.
What you should know before beginning
From DDWRT: V24 preSP2 Beta Build 13064 (check the DDWRT site for updates)
If all goes well you will end up with the following DDWRT interface.

Hardware Hacks for the future of my router
http://www.allaboutjake.com/network/linksys/wrt54g/hack/
You must be logged in to post a comment.